Step 1: Surface preparation
Although your Mohawk Ceramic Tile is suitable for installation atop almost any sturdy surface, prepping the area beforehand helps to guarantee the best result.
Make sure your surfaces are clean, smooth and dry. Take time to clean, smooth and dry your surface as well as repair, patch and level any damaged or uneven areas. In addition to being structurally sound, double–check to make sure your area is free of wax, soap scum, and grease prior to starting the installation process.
Also, remove any moldings, trim, or appliances that may present interference when you begin laying down tile. Be sure to examine the doorjambs in your room and determine if the tile will have room underneath.
Identifying these potential complications in advance ensures that your overall installation adventure is as smooth as your new Mohawk floor.

Step 2: Layout
While tile installation can initially seem like a daunting task, using an efficient layout will alleviate any worries you may have.
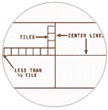
Your layout begins with marking the center point of each of the four walls in the room. Next, snap chalk lines between the center points of opposite walls to pinpoint the center of the room. Adjust these lines if necessary to make sure that the intersection creates perfect squares.
Continue by laying out a row of loose tiles along the centerlines in both directions. While doing this, use tile spacers to provide room for uniform joints. Should this layout leave cuts at the walls at a size smaller than half of a tile, you can adjust the centerline by snapping a new line a half tile size closer to the wall. If necessary, repeat this step along the intersecting centerline to achieve a precise design.
Now you can pide each section into smaller grids (approx. 2′ x 3′) by snapping additional lines parallel to centerlines. Notice how your large room is now a manageable, compartmentalized space ready for beautification.
Step 3: Applying adhesive
No matter which style of Mohawk Ceramic Tile you select, the wrong adhesive for the surface you are covering will hinder installation. After choosing the appropriate type, carefully read and follow all instructions and precautions on the adhesive or mortar package.
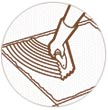
As a general rule of thumb, be mindful to mix only enough of the adhesive to be used within 30 minutes time. Using the flat side of the trowel type recommended on the adhesive package, spread a 1/4″ coat on the surface of one grid area without covering the guidelines.
After doing so, hold the trowel at a 45–degree angle and use the notched side to comb adhesive into standing ridges. When you remove the excess adhesive, you leave behind a uniform, ridged setting bed for your tile. As another rule of thumb, do not spread a larger area of your adhesive that can be set in 15 minutes.
“Stick” to the script and facilitate your tile installation with the perfect adhesive application.
Step 4: Cutting tile
Customize the shape of your Mohawk Ceramic Tile and you can simultaneously achieve the perfect fit while adding a dose of creativity.
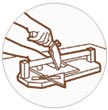
Start by marking carefully measured cuts–to–be with a pencil or felt–tip pen on the tile surface. You can use a tile cutter to achieve pinpoint straight or diagonal cuts. Make masterful curved cuts with a nipper, chipping away small pieces for best results.
For any full–length curved cuts, a rod saw is most properly–suited to handle the task. After your cuts are made, smooth out any sharp edges with a carborundum stone to give a soft finish to your tile.
Step 5: Setting tile
One of the most visually attractive characteristics of Ceramic Tile is the variation of shades found in every style. Be sure to take full advantage of the naturally distinctive quality of tile as you set your stunning floor into place. Let’s see, you’ve primed the surface, created the layout, applied the adhesive, cut the tile — is there anything we’re leaving out? Not at all, you are now fully–prepared for the actual installation of your Mohawk Ceramic Tile.
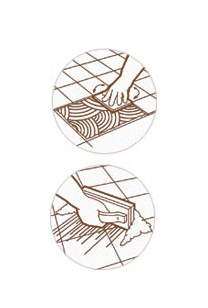
Begin by installing tiles in the center of room, one grid at a time, finishing each grid before moving to the next. Within each grid, it will help to start with the first tile in the corner and work outward.
Using a slight twisting motion, set tiles one at a time and avoid sliding them into place. Be sure to either insert spacers as each tile is set or leave equal joints between tiles. Save the perimeter tiles in each grid for last, leaving a ¼” gap between the tile and wall.
Once a grid is completely installed, tap in all tiles with a rubber mallet or hammer and wood block to ensure a solid bond and level plane. Remove excess adhesive from joints with a putty knife and from tile with a damp sponge to prevent an uneven appearance.
Lastly, allow your hard work at least 24 hours to set before walking on it. And of course, take at least 20 minutes to admire the time and care you have put in to your new floor!
Step 6: Grouting joints
Now that your Mohawk Ceramic Tile is in place and has had 24 hours to set, your last step is to “grout” or fill the joints and consolidate your floor into one mass.
After carefully reading and following all instructions and precautions on the grout package, make only enough to use in a 30 minute period. As you remove the tile spacers and spread grout on the tile surface, use a rubber grout float or a squeegee to force it down into the joints.
Tilt the float at a 45–degree angle and with the edge of the float, remove the excess grout from the surface immediately. Now tilt the float at a 90–degree angle and scrape it diagonally across the tiles.
Once you’ve let the grout set slightly for around 15–20 minutes, use a damp sponge to clean any residue from the surface and smooth the grout joints. Make sure to rinse your sponge frequently and change the water when needed.
Polish with a soft cloth when the grout has dried and haze forms on the tile surface, and rinse again with sponge and clean water if necessary. Give your newly grouted floor 72 hours before any heavy use and at least three weeks before applying sealers or polishes.